The procedure for exporting a map as a Scalable Vector Graphics (SVG) file is nearly the same as for printing a map. You first insure that the exact map scale, view, and display attributes (sizes and colors), are set the way you want. Then, instead of selecting File | Print map, you select File | Export map as SVG file -- or just click a toolbar icon:
![]() The left icon invokes the SVG Export dialog described below. The right icon launches the SVG viewer, Walls2D, with a previously generated SVG.
The left icon invokes the SVG Export dialog described below. The right icon launches the SVG viewer, Walls2D, with a previously generated SVG.
The dialog can be opened whenever a compiled project branch is being reviewed in plan mode -- that is, when any page of the Review dialog is active and the current view (as would be seen on the Map page's preview map) is a plan rather than a profile. The SVG export of profile views is not supported in this release of Walls.
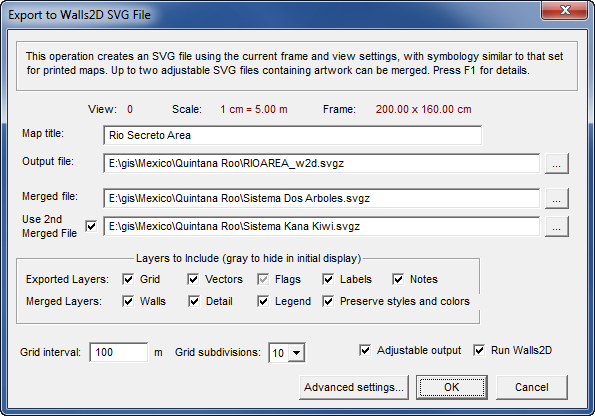
Shown above are the dialog settings that would produce an SVG suitable for roundtripping with Adobe Illustrator v10-CS6. (See Roundtripping SVG Maps for an overview of this capability.) In this example, the exported SVG would have not only survey features, but also artwork merged from two existing source SVG files. Furthermore, it would contain the metadata necessary for it, in turn, to serve as a source SVG in future export operations. Alternatively, you can produce simpler kinds of SVGs, either raw exports containing survey features alone (no merged artwork) or complete SVG maps (no metadata) intended for efficient viewing and printing.
Your choices for most options in this dialog are saved in the compiled item's NTA workfile and will be recalled for each export operation involving that item. There is also a group of less frequently changed settings that are remembered between program invocations. These are accessed via the Advanced Settings button.
Map Title - Optional text that will be stored as part of the exported SVG's metadata, allowing Walls2D and other software to retrieve a map title. The text is initialized to the Title property of the project item being reviewed (See Properties: General page). The map title, along with the scale, orientation, view dimensions, and center coordinates, will form a string of text in the map frame's lower left corner. Although the text string can serve as a legend substitute, its main purpose is to provide georeferencing information and its visibility can be controlled. For details, see the w2d_Ref layer under SVG Layer Descriptions.
Output file - The SVG file to be written. The default file location is the project folder. The file's default name is the reviewed item's workfile base name with "_w2d.svgz" appended. You can change the name, but using the w2d suffix makes the file easily recognizable as an SVG generated by Walls.
Note that there are two types of SVG files: uncompressed with extension ".svg" and compressed with extension ".svgz". The program can work with either kind, both as output files and as merged files (see below). The advantage of using uncompressed SVGs is that they can be directly viewed and modified with an ordinary text editor, though preferably with an xml-aware editor such as the excellent Notepad++. The disadvantage is that an uncompressed SVG can be up to four times larger that its compressed version. Also, the processing time overhead due to compression is insignificant. Therefore, the program assumes you'll be using compressed SVGs when it constructs default file names. When you want an uncompressed output file, simply delete the trailing z from the name. Walls2D will open either kind and also provide options to view the SVG as text and save it compressed or uncompressed under a new name.
More often than not you'll be accepting or entering a name that matches that of an existing file. In such cases the export function first examines the file. Only if it's found to be an unmodified Walls export will it be overwritten without warning. An unmodified Walls SVG is recognized by the presence of a specific XML processing instruction: <?walls updated="no" ... ?>. This is never present in an SVG saved from Illustrator.
Merged file - An existing SVG source file, if one is being used. You are assumed to be using one if at least one control in the Merged Layers section has a check mark (see below). When the dialog opens, this field is initialized to the pathname of the first SVG that's attached, at any sublevel, to the project branch being reviewed. It must also have an assigned type of Other. If no SVG file is attached, the default file name is the item's workfile base name with suffix _mrg.svgz appended. The default location is the project folder. The merged file doesn't have to be a project tree item.To be successfully merged, an SVG must satisfy two basic requirements:
| • | It must contain the metadata that was produced by a Walls export operation -- one in which the Adjustable output option was enabled (see below). The file may or may not have been routed through another program like Illustrator, which necessarily preserves the metadata while possibly adding new content. |
| • | The originally exported survey vectors (elements in the SVG file's w2d Vectors layer) should be a subset of the compiled survey data being exported. That's because the adjustment of artwork depends on knowing how those particular vectors shifted position. This is not, however, a strict requirement for a successful export. |
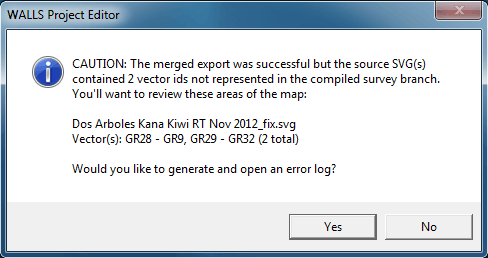
At the end of the export operation a dialog box (see above) will appear if the SVG source file contained identifiers for vectors not in the database and were therefore ignored. The operation will have aborted, however, if the count of missing vectors had exceeded 500. In either case the orphaned vectors are optionally listed in a log file so they can be reviewed. For example, you may have inadvertently compiled only part of the survey represented in the SVG. Or a few vectors could have become obsolete due to data corrections, in which case relying on the shifts in other vectors for artwork adjustment and touching up manually is often adequate for a successful roundtrip. In these situations there's no longer a need to delete vectors by editing the SVG source file. (Editing it might be desirable if a vector's endpoint station had simply been renamed without it's position having changed as a result.)
It's not required that the orientation, scale, or frame dimensions of the source SVG match those of the exported SVG. Nor must the coordinate units, feet or meters, be the same. When displaying coordinates, Walls2D will use the review units you had set at the time of export. Although the zero references (or geodetic datums) can be different, this isn't recommended since it would cause misplacement on the page of a merged legend layer (world coordinates unchanged). For the same reason, don't change the type of coordinate system. If the source SVG is UTM grid-relative then the compiled data you're exporting should also be UTM grid-relative.
Use 2nd Merged File - A recent program enhancement is support for an optional second merged SVG containing artwork. This makes it easy to combine, as needed, the drawings for segregated regions in an extensive cave system. For such projects it helps when most of the Illustrator work can be done using moderately-sized files covering specific regions. Trying to combine adjustable Illustrator documents manually while maintaining the correct layer arrangement would be very difficult and prone to errors.
The format requirements for the second file are the same as for the first. Their scales and orientations, however, don't need to be the same. There are a few differences in the processing of the two files. Certain styles. say for station markers when they are inherited, are taken only from the first file. When initializing this dialog, the program fills the two pathname boxes with the first two SVG files that it finds attached to the project tree beneath the compiled branch. (Their Type should be Other.)
Exported Layers - Optional layers in the exported SVG that represent objects in the survey data. Those are the same objects whose visibility you can control on displayed and printed maps in Walls. Data in detached branches of the Segment tree will not be exported. Note that the check boxes are tri-state. A bold check mark specifies that the layer will not only be present, but also visible when the file is initially loaded into Walls2D (or your browser). A gray check mark specifies that the layer will initially be hidden but is subject to being toggled on. When the Adjustable output option is checked, the Vector layer is automatically included, and it's recommended you also include the other layers (bold or gray check mark). When you're not inheriting color and size attributes from a merged file, it's important that you first set these appropriately for the exported layers in the same way you would for a printed map. Inheriting attributes is an option labeled Preserve styles and colors (see below).
Merged Layers - Layers in the specified Merged file to include in the exported file. Walls will not only include those layers, but also adjust their content when necessary to fit revised surveys or a new map view. For a description of the Walls, Detail, and Legend layers, and the type of graphics they're expected to contain, see SVG Layer Descriptions. The check boxes for the Walls and Detail layers are tri-state and have the same effect described above for the Exported Layers. Users of Walls2D can control the visibility of each layer via a corresponding toolbar button. You must clear all three check boxes in this section to insure that no merge operation is attempted.
Preserve styles and colors - When this option is enabled, the color and size attributes of survey features are inherited from layers in the merged file as opposed to taking them from current project settings. These include the background and passage floor colors, vector line colors, label and note type sizes, and so forth. This is the usual choice since it frees us from having to worry about Walls display options when creating adjusted, possibly zoomed views of an existing SVG source file. Turning off this option allows you to change the appearance of certain features when it's necessary. For a list of what specifically can be inherited, see SVG Layer Definitions
Grid interval and Grid subdivisions - The interval setting is the distance in meters between major grid lines in the optional square grid (one of the Exported layers). When the SVG Export dialog opens, this interval is the same as what's set for "East interval" in the Grid Intervals dialog accessed via the Map page. Minor grid lines will also be included if you specify a number greater than one for the number of grid subdivisions. The grid is always aligned with grid north or true north, depending on whether or not the reviewed item was compiled with "UTM grid-relative" enabled.
Adjustable output - This option must be enabled in cases where the output is destined for roundtripping -- that is, if the exported SVG is to serve as the Merged file in future export operations, possibly after more artwork is added to it outside of Walls. This insures that certain elements (vectors, labels, and notes) are stored with metadata linking them to the survey database. In a non-merged export that's adjustable, you might be establishing for the first time the view, scale, and frame dimensions you've chosen for a full-sized printed map -- usually a scale in the range 1 in = 20-50 ft that's suitable for showing maximum detail. In a merged export that's adjustable, you will likely have set the view parameters to match or at least cover those of the source SVG, the file you're in effect updating. In any case, it's expected that adjustable SVGs will rarely be zoomed views of a larger map, a situation that might cause some elements to be visible outside the frame. (See Note for Illustrator Users.)
Uncheck the Adjustable option for all other cases, such as when creating a "final product" that's most efficient for printing and viewing interactively -- perhaps a zoomed view of a larger source SVG. Content outside the frame is perfectly clipped in this case. The file will be moderately smaller in size since it won't have the metadata needed by Walls for an adjustment.
Run Walls2D - Mark this check box to launch the SVG viewer, Walls2D.exe, immediately after a successful export operation. (Alternatively, you can use the toolbar button labeled "2D".) You can then explore the SVG image by zooming, panning, and toggling layer visibility. If the check box is not marked, statistics will instead be displayed signaling success of the operation. These include the total path lengths for features in the Walls and Detail layers. If a feature adjustment was necessary, the maximum shift detected in a vector endpoint's position (the condition that triggered the adjustment) is reported.
Advanced Settings - Opens a dialog with options that pertain mostly to feature adjustment and the processing of Merge file layers. See SVG Advanced Settings.