The compile options edit box is an advanced feature that might be useful, for example, when experimenting with instrument corrections, name prefixes, or other settings you may want to apply to a group of files. It allows you to pass #Units Directive parameters to the module of Walls that interprets raw data files during compilation. For example, "IncA=0.5" would cause a half-degree correction to be applied, by default, to all compass and tape azimuth measurements in all data files contained in this project tree branch. Any such parameters can be overridden within the files themselves.
This is a particularly good place to put macro definitions, such as $UV_001="UV=0.25", which allow you to specifically target subsets of data scattered throughout the branch. Another advantage of macros is that you can specify settings for other kinds of directives, not just #units. See Defining and Using Macros.
When each data file is opened for processing, all non-blank Compile Options settings encountered in a project tree traversal, starting with the root and ending with the file itself, are processed as if they were a sequence of separate #Units directives inserted at the top of the file. (Do not include the keyword "#Units" in the Compile Options field, only the directive's arguments.) The attached/detached state of branches is ignored during the traversal.
Important Note: Obviously, if this edit box contains parameters necessary for the correct interpretation of your data files, then it's crucial that the WPJ file be kept with your SRV files and that the latter have appropriate comments. You must also be careful when moving the affected data files to other project tree branches. Ideally your SRV files should be self-contained and have their own #Units directives or at least comments to describe their requirements.
Inherited Options
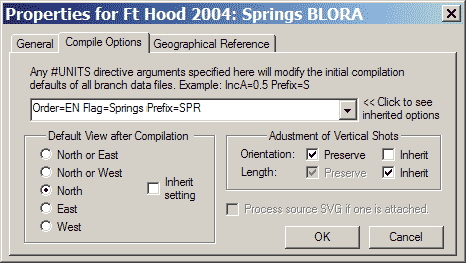
The Compile Options dialog (like the Geographical Reference page described below) illustrates the use of inherited options. In the example pictured above, orientation (verticalness) of pure vertical shots is explicitly set to "Preserve". The status of the length preservation option, however, is inherited from the parent node in the project tree. In this case, a grayed check mark reveals that a "Preserve" setting is being inherited. This facility allows you to control the processing of many surveys by accessing the Properties dialogs of just a few high-level book nodes. (A detached node does not break the inheritance chain.)
In the example above, entry "Order=EN Flag=Springs Prefix=SPR" specifies three #units parameters to be used in the compilation of all data files in project book "Springs BLORA." It's possible, however, to override these settings in the Compile Options properties of sub-branches or in the data files themselves. By clicking the down-arrow at the right of this edit box you can view (but not edit) the list of compile options inherited from parent book nodes.
Default View After after Compilation
This setting determines the default orientation of the preview map for all network components after a compilation. Normally Inherit Setting will be checked, causing the orientation preference to be inherited from the parent item. The default preference for the project root is initially "North or East", which causes the same program behavior exhibited by versions of Walls prior to 2B7. That behavior is to choose either North or East depending on which view would give the largest scale. In the example above, the default view preference is overridden (Inherit setting not checked) and specified as North. Note that on the Map page you can change the view to any orientation and Save it. If you then Review the item (as opposed to recompiling), the last saved view will be restored.
Process SVG if One is Attached
This option specifies that a source SVG file, if attached to the project tree beneath this item, will be automatically processed during each compile operation. This will slow the compilation process somewhat. The result will be a workfile with extension NTW which can optionally be used for drawing passage outlines in place of LRUD polygons. This feature is independent of SVG export operations. The NTW file is useful only for printed and displayed non-SVG maps, or for metafiles and shapefiles. For this to work, the SVG file must contain a w2d_Mask layer. (See SVG Layer Definitions.) You must also turn on the option to use the processed SVG data in the Passage Display Options dialog.
Adjustment of Vertical Shots
These settings affect how pure vertical shots (i.e., +90 or -90 degree inclinations) are handled during a least-squares adjustment. Ordinarily, such shots are treated like normal compass-and-tape vectors and weighted inversely proportional to length -- see Variance Assignments. Also, like normal shots, you can place a variance override on the respective data line. In particular, "(0,)" would constrain the horizontal components, "(,0)" would constrain the vertical component, and "(0)" would constrain all components. The check boxes in this dialog allow you to redefine the default assignments for just the vertical shots in this project branch.
It's debatable what these assignments should be when we're dealing with ordinary "good" data. It's been my experience when cave surveying that I'm usually far more confident in the measured length of a drop than I am its verticalness. It's not always easy to position a marked station directly over another marked station, the result being we're kind of sloppy about station positioning. The difficulty increases with long drops. Compared to a near-horizontal shot of the same length, a vertical shot would likely contribute at least as much horizontal error while contributing far less vertical error to a traverse. Vertical shots are a very good way to measure depth in a cave, whereas near-horizontal traverses are a very poor way. My preference, therefore, would be to preserve length and not orientation.
The issue of appearances, however, might favor a different approach. If the default adjustment changes a shot's vertical orientation so much that it's noticeable on a plot, then we're probably dealing with a relatively short bad traverse -- possibly one that we've decided to float. Recall that when we float a traverse we are less concerned with location accuracy within the traverse (we know it's bad) than simply having it "look reasonable" when it's plotted. We don't want to leave one end dangling, and we don't want the traverse's presence to distort the remaining network. In this circumstance there's little harm in maintaining the verticalness of shots we've recorded in our notes as being vertical. By making this choice we insure that the total horizontal component error in a traverse is resolved by adjusting only the non-vertical shots.
Technical Note: Selecting "Length: Preserve", for example, is not quite the same as specifying zero for the vertical component error variance on each data line defining a vertical shot, as with "(,0)" . While the latter would indeed prevent any vertical adjustment whatsoever, it could conceivably cause Walls to halt compilation when more than one vertical shot existed between a pair of stations. (The same limitation exists for loops comprised entirely of constrained vectors.) To prevent this from happening, a positive but insignificant variance is assigned.