Whenever a portion of your data is processed or reviewed, whether it be a single survey data file or a project tree branch consisting of many files, a page of list boxes describing the resulting network geometry appears as a page in the Review dialog's window. In the initial stages of working with new survey data you will consider this page your "control center" for data screening. On other occasions, when survey files are considered fully debugged, you will skip the Geometry page, moving immediately to the Map page to select specific regions for printing or screen display. Depending on the situation, you can toggle a preference setting (a toolbar button resembling a map), that determines whether or not the Geometry page, as opposed to the Map page, is immediately displayed when the Review dialog is called up.
The Geometry page is described here on an item-by-item basis, where it's assumed you've already reviewed the definitions in Network Terminology. For a short tutorial on the use of this page, see Data Screening Tutorial. Also, if you're really interested in knowing how the statistics are computed, see Statistical Formulas.
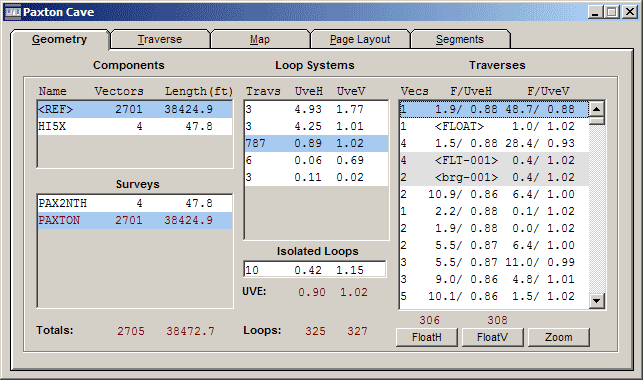
The compiled data will define a network of possibly more than one connected component. (This means there are no traverses connecting the separate components and no #FIXed stations establishing their relative locations.) Each component is shown in this list box as a line of data: the reference station, the total number of vectors, and the total length. The reference station is named "<REF>" if the component has fixed points; otherwise it is simply the first station of the component encountered during compilation. (Data files are processed in the order that they appear in the project tree.)
If there is more than one component, the one you select (highlight) in this list box affects the contents of the remaining list boxes on the Geometry page. Also, the other tabbed pages, including the Map page, will reflect only the component that is selected. The components are listed in no particular order. The first component featuring a loop system (if there is one) will be highlighted when the dialog is initially opened.
Since it is usually more convenient to compile and review disconnected surveys separately, the Components list box will normally contain just one item. More often than not, multiple components reveal the presence of "hanging" surveys due to missing data or misnamed stations. In this case, you will want to select the unexpected component and then double-click the red-colored item in the Surveys list box (see below). This will open an edit window showing the "orphaned" reference station as it appears in a data file.
Surveys
This list box displays the names of the data files, along with vector counts and total lengths, in the order they were processed. One of these list box entries will be shown in red. This file contains a defined vector involving the selected component's reference station (see above). Double clicking the entry will activate an edit window highlighting the vector's data line. Double clicking any other entry will simply open the respective file.
Loop Systems
The selected component's loop systems -- those with loop counts greater than one -- are listed here. Shown for each loop system is the number of traverses followed by the unit variance estimates for the horizontal and vertical dimensions: UveH and UveV. The systems are sorted in order of increasing quality -- that is, those with the largest combined UVE appear at the top of the list. Inevitably, the worst UVEs will sometimes be too large to print in the allotted space. On those occasions you will see "--.--" instead of their true values.
The contents of this list box should become more or less familiar to you after repeated processing of a project's evolving data set. Initially you'll want to examine each loop system in turn by selecting the corresponding list box entry, thereby filling the Traverses list box (see below) with information about the system's traverses. (The Map page also highlights the selected system in blue.) The goal is to correct or float traverses while lowering the system UVEs to tolerable values. While a UVE much larger than one indicates the presence of bad measurements, a modest-sized UVE for a large system doesn't necessarily imply the opposite -- that is, "outlier" traverses can still be present. Whatever the case, at some point you should inspect the list of traverses for each loop system.
The separate treatment of the horizontal and vertical components of a survey should assist you in your data screening efforts. Errors in compass readings, for example, will affect only UveH, while reversed signs in inclination readings will affect only UveV. Depending on the survey, inclination and distance errors can contribute to both statistics, but will often have a disproportionate affect on one or the other.
Isolated Loops
A component may have numerous isolated loops, each of which is a loop system comprised of just a single traverse. For convenience these are lumped together and analyzed as if they were a single loop system. This special "system" is selected by clicking in the separate 1-item list box labeled "Isolated Loops" -- an operation that automatically unselects whatever multiple-loop system happens to be highlighted in the list box just above it. Displayed here is the total number of isolated loops along with the overall horizontal and vertical UVEs. When the Isolated Loops box is selected, the statistics for the closed traverses will be displayed together in the Traverses list box. Also, the selected loop will be shown in red on the Map page. All other isolated loops will be shown in blue.
Traverses
This list box contains statistics for the selected loop system's traverses. When we're examining a system with a large UVE we can usually restrict attention to just a few of the listed traverses, namely those that themselves have bad statistics. For each traverse the number of end-to-end vectors forming it is displayed in the leftmost column. Except for special cases, the remaining columns consist of pairs of statistics that indicate how well the traverse closes with the surrounding network. (The cases in which a bracketed expression, such as "<FLOAT>", replaces a statistics pair are described in the next section.) Normally, you'll see a pair of numbers for the horizontal components, labeled "F/UveH", and a pair of numbers for the vertical component, labeled "F/UveV". Each such pair is defined as follows:
The number above the slash is the traverse's F-ratio. Its size reflects the traverse's disagreement with the remaining traverses in the selected loop system. If it is greater than one, then discarding the traverse will cause the system's consistency to improve -- that is, the system's UVE will become smaller. If it is less than one, then discarding the traverse will cause the consistency to worsen. If it is zero, then the traverse is in perfect agreement with the remaining data: its best correction is zero. In practice, the F-ratios for a reasonably "clean" system will range in value from 0 to 10, with only a few above 5. One possible strategy is to always examine closely the worst few traverses in each loop system while either fixing or permanently floating any traverse with an F-ratio in the double-digit range (or beyond, in which case "--.-" is displayed).
The number beneath the slash is the value that the system's UVE would attain if the traverse were discarded. If it is larger than a value you consider tolerable, then you know that throwing out (or even fixing) this particular traverse will not solve all your problems. Unfortunately, it's not uncommon for a loop system to show evidence of multiple blunders. Since the traverses are ordered by decreasing F-ratio (horizontal and vertical combined), the ones affected by blunders should all be near the top of the list. Removing the effect of a bad traverse by floating its horizontal or vertical components (see below) might change the ranking of other traverses; however, an advantage that these statistics have over traditional methods of flagging "outliers" is that there is less tendency for one bad traverse to severely inflate the statistics of traverses nearby -- even if the situation is as drastic as a misnamed station. The result is that multiple blunders in one loop system can often be detected after a single compilation.
If a traverse happens to consist entirely of constrained vectors (i.e., its assigned variance is zero), the word "<FIX>" is displayed in place of the statistics. The program doesn't compute the statistics in this special case, although technically they are obtainable. For example, you can determine the best correction and UVE after detachment by floating the traverse as described below. If you have several constrained traverses in a loop system and want to know if any of these "stress" the network significantly, you can toggle the float status on and off for each one in succession. (For further discussion of this case see the note at the end of the Traverse Page topic.)
When a particular traverse is selected, it's possible to obtain additional information in various ways. First, you can switch to the Traverse page, which lists the traverse's vectors in their natural order along with suggested measurement corrections. (This switch can be accomplished by simply double-clicking a list box entry.) From the Traverse page you can easily (by double-clicking a vector) invoke the text editor to view or correct the relevant lines of raw data. Another way to examine the traverse is to switch to the Map page, which shows the selected traverse highlighted in red. (If it is just the traverse you are interested in, use the Zoom button instead of the Map page's tab.) Finally, you can use the Float/Unfloat buttons to examine the effects of excluding the traverse from the loop system's data. In fact, the successive steps of selecting a traverse, clicking one of the float buttons, and then either double-clicking the traverse or clicking the Zoom button, together form what is perhaps the most frequently-used data screening operation.
Float/Unfloat Buttons
When a traverse with obviously bad statistics is noticed, a possible next step is to highlight it in the Traverses list box and use the FloatH and FloatV buttons to float whichever components, horizontal or vertical, stand out. This action involves reprocessing the loop system's data -- a least-squares readjustment in which the measured components of the selected traverse are given zero weight. If the loop system is large (it would have to be very large nowadays), you may witness the hourglass icon for several seconds before the screen is refreshed with new statistics.
The main benefit of floating a suspect traverse is that you can then home in to it on the Map page (see the Zoom button below) and see the network around it undistorted, either by this traverse and any others that may have been floated. Also, the raw unadjusted vectors of a floated traverse are shown in yellow, while those that are adjusted to conform to the rest of the network are shown in red. Some common types of data errors -- misnamed stations and reversed shots, for example -- are in this way made quite obvious. Another benefit is that with the updated statistics you can continue the data screening process without editing data files and recompiling. Although the "discarded" traverses will no longer play a role in the statistical ranking of other traverses, they obviously can't be of any assistance either. Therefore, as soon as you confirm mistakes in the data, you should fix them right away and recompile to take advantage of the new information.
The process of dynamically floating and unfloating traverses, besides changing the statistics, will affect the appearance of certain items in the Traverses list box. Except for the special case of traverse chains (see below), when a traverse is floated the corresponding statistics are replaced with <FLOAT>. The horizontal or vertical component of the traverse is effectively discarded and the loop count is reduced by one. At the same time, if the operation makes certain other traverses essential for keeping the network connected, the statistics for those other traverses are replaced with <BRIDGE> (or more likely something like <brg-001> -- see below). This means the operation turned them into non-loop elements, called bridges.
Interactive float/unfloat operations will not change the sort order or scroll position of items in the Traverses list box, even though their ranking by combined F-ratio might be affected. This helps us keep track of traverses which are identified here only by their statistics and vector counts. After floating several traverses we sometimes have to peruse the list a bit to locate the largest F-ratio (horizontal and/or vertical) among the remaining traverses.
A relatively new feature of Walls is special support for chained traverses, whose statistics appear with a gray background in the Traverses list box. (The example dialog above has one 2-traverse chain displayed.) Chained traverses have a different behavior when operated on with the Float/Unfloat buttons. You might see <FLT-001> instead of <FLOAT>, or maybe <brg-002> instead of <BRIDGE>. Unlike normal bridges, which technically can't be floated without disconnecting the network, traverse chain bridges can be floated in a certain sense. This means you can use the FloatH/FloatV buttons to float an entire traverse chain, which may be preferable to floating an arbitrarily chosen member of the chain. For details, see Floating Traverse Chains.
Zoom Button
Clicking this button switches to the Map page while at the same time rescaling the map so that the selected traverse almost fills the frame. This also automatically checks the Selected, Label, and Mark check boxes on the Map page -- the idea being that you will probably next want to generate a map with station labels. The view direction and plan/profile orientation currently set for the Map page, however, are not changed. For example, if you float only the vertical component of a traverse and Zoom to the Map page in plan view, you will then need to switch to profile view to see any yellow lines (the unadjusted version of the traverse).
Locating a Vector in the Geometry
When the Geometry page is active, the Search | Find operation (accessed most easily via the binoculars icon on the toolbar) will locate the component, loop system and traverse (if any) containing a specified vector. You are prompted to enter a pair of station names in any order, separated by tab(s) or space(s). Be sure to include explicit name prefixes (e.g., "SRV1:A100 14C") when necessary to distinguish between duplicate names. Prefixes can be omitted when there is no chance of conflict. The search will stop upon finding the first matching vector contained in a loop system. After a successful search the containing system and traverse will be highlighted. Also, upon switching to the Traverse Page, the target vector will be selected and in view.
Searching from and Edit Window
There's also a more direct way to search for a vector in the geometry. To see the effect on statistics of a shot in a survey file you're editing, simply right-click on the shot line to open the editor's context menu. Then select Find vector in statistics. If the vector is part of a loop system, the corresponding traverse will be highlighted on the Geometry page. This also works to highlight a vector's statistics on the Traverse page, if that page is in view.