When a Walls project (WPJ file) is opened or created, a tree-like diagram is displayed in its own window. The tree shows the current organization of the project's data files, ideally one that makes it easy to examine selected portions of the data (e.g., geography, caves, field books, dates, people, etc.) There is one root, a "folder" icon representing the entire project. Beneath this are named surveys (little page icons) optionally grouped under named books (little book icons).
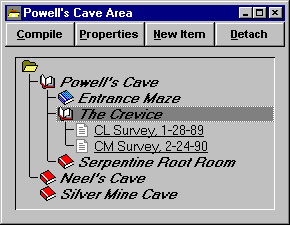
The labels for tree items are constructed from the Title property, Name property, or both (Name:Title), which depends on a setting in the program's View menu: Titles Only, Names Only, or Both. (See Properties : General Page.) In the example below, the labels are titles.
|
Click on each of the four labeled buttons at the top of this image to see what actions they invoke. In this example, "The Crevice", would be the item affected. Notice that the "Entrance Maze" has already been compiled.
|
The project tree behaves in the expected way when operated on with the mouse: Double-click a book to collapse or expand the corresponding branch one level. Double-click the root to collapse or completely expand the entire tree. Double-click a survey to open an edit window into the corresponding text file. Click the right mouse button on an item to display a popup menu with available operations.
Note that leaf nodes of type Other have their own style of icon (not shown above). What happens when their icons are double-clicked is a property you can specify. (See Properties: General Page.)
Typically, you'll start Walls and a project window containing the last project you accessed will appear on the left side of the screen. You'll expand the appropriate book if the survey title you're interested in is not visible. You'll double-click the title, causing the field book data to appear in a window on the right side of the screen, ready for you to edit. For a description of the built-in editor, see Survey Text Editor.
Detached Branches
In this example, "Silver Mine Cave" is in a detached state. A detached item is skipped (ignored) during the compilation of either its parent or of an item closer to the tree's root. This means that if the root folder were to be compiled, and you were to review the results, you would seemk:@MSITStore:C:\Work14\bin\walls32.chm::/general_page.htm a network comprised only of Powell's Cave and Neel's Cave. As long as surveys have uniquely named stations, a successful compilation never requires that certain branches be attached or detached since a reviewable network can consist of more than one connected component.
The items in non-collapsed books of a project branch can be sorted alphabetically by their label. (Depending on a setting on the View menu, labels are formed from an item's Title property, Name property, or both.) To do this, right-click the branch to open a pop-up context menu, then select Sort visible items in branch. Since parent-child relationships are preserved in a sort operation, only the order of siblings is affected. Also, the operation occurs quickly without prompting. One way to see if a change to the tree actually occurs is to observe the diskette-shaped icon on the toolbar (Save button). If the icon changes from gray to black, at least some items had to be reordered.
Another way to rearrange the project tree is to drag a book or leaf item from anywhere and drop it on its new parent. It will become the parent's new first child. You can also use this drag-and-drop feature to reorder, for appearance's sake, a set of siblings. (It would not be a processing requirement.) You'll discover that since only the root folder and books can have children, dropping something on a leaf will create a sibling just beneath the leaf, not a child.
One complication that can arise when dragging a branch to a new parent, is that the effective data file path can change if the branch's path property is relative rather absolute. In this case, if the new parent's default data path differs from that of the old parent, you will be prompted to choose between three alternatives: 1) actually move the affected data files, 2) leave the files in place by making the dragged node's path property absolute, or 3) cancel the operation.
In a manner similar to the Windows File Manager, if you drag with the right mouse button, a pop-up menu of choices is displayed when the button is released. These choices are more numerous when transferring branches between different projects as discussed below.
When files have to be moved (or copied -- see below), prompts to confirm the overwriting or skipping of existing files can appear, in which case the dates and sizes of different file versions are shown. With each encounter of a matched name, your options are "Replace", "Replace All", "Skip" , and "Skip all dups". Files with identical names, sizes, and last update times are considered "dups". The program, of course, will preserve all file attributes during move and copy operations.
Removing Tree Branches
To remove a project tree branch, first select the branch to highlight it, then either press the Delete key or select Remove Branch from the right-click context menu. A dialog is displayed that gives you two choices besides Cancel. One is simply to remove the branch from the project while deleting any workfiles produced during compilation. The other choice is to delete all associated data files along with the branch. Data files will actually be moved to the Windows recycle bin. Be aware that operations on the project tree, particularly branch deletions, cannot be undone.
Transfers Between Projects
A feature easily overlooked is the ability to open more than one project and to transfer items between their respective trees via drag-and-drop. Here you can use the standard technique of holding the CTRL key down to copy a branch when you don't intend to move it. Alternatively, drag with the right mouse button to invoke a pop-up menu of choices described below. A transfer that would cause two tree items to have the same name property is disallowed since a project's item names, if nonblank, must be unique. All copies within a single project tree window are therefore disallowed.
Although it's normal practice, it's not a requirement that data files share the same disk directory as the project script file. Each project tree item has a path property that can be either absolute (e.g., containing a drive letter) or relative to that of its parent. Therefore, assuming the tree node you're dragging to a new parent has a relative path property, it's quite possible that the data files themselves will have to be copied or moved if we are to preserve the node's parent-relative path. When this happens, you will be prompted for a decision regarding the disposition of data files: move or copy them, or keep them in place by forming absolute links.
To avoid such unexpected prompts, you can drag with the right mouse button. Upon button release, a pop-up menu will present you with five choices: 1) Move branch and files, 2) Move branch alone, 3) Copy branch and files, 4) Copy branch alone, or 5) Cancel. When files remain in place, the path property of the dragged node is transformed into an absolute path if necessary. (The program will generate a new relative path if possible.)
(Also see Properties: General Page, and Setup and File Usage.)