Difference between revisions of "Ubuntu"
imported>Jack Hughes |
imported>Jack Hughes m (→Connect to Scholar WebDAV) |
||
| Line 96: | Line 96: | ||
The Scholar site for students taking classes has an option for connecting to the web directory to download the resources uploaded by the teacher and site administrators. To connect, it's very simple and it makes an easy way to keep all your class resources up to date and provides an great way to copy multiple files to your computer at one time. | The Scholar site for students taking classes has an option for connecting to the web directory to download the resources uploaded by the teacher and site administrators. To connect, it's very simple and it makes an easy way to keep all your class resources up to date and provides an great way to copy multiple files to your computer at one time. | ||
| − | + | <img src="http://vtluug.org/w/images/4/48/VT_Resources_Scholar_Screenshot.png"> | |
Notice the link called "Upload-Download Multiple Resources". This is the link you will click that takes you to a page with the server information you will need to connect to the remote directory. The page also includes instructions for setting the WebDAV link up on Windows and Mac computers, but not Linux, so you can ignore pretty much everything beneath the URL to the server. You will see a part that gives you a "SiteID". This "SiteID" is the unique part of the server URL that allows you to connect to it with your Virginia Tech PID. | Notice the link called "Upload-Download Multiple Resources". This is the link you will click that takes you to a page with the server information you will need to connect to the remote directory. The page also includes instructions for setting the WebDAV link up on Windows and Mac computers, but not Linux, so you can ignore pretty much everything beneath the URL to the server. You will see a part that gives you a "SiteID". This "SiteID" is the unique part of the server URL that allows you to connect to it with your Virginia Tech PID. | ||
| Line 124: | Line 124: | ||
7) Put in your Scholar password, and your done! | 7) Put in your Scholar password, and your done! | ||
| − | + | <img src="http://vtluug.org/w/images/a/a3/VT_Resources_Connect_to_Server_Screenshot.png"> | |
Revision as of 15:12, 21 January 2011
Below are some recommended steps to customizing Ubuntu to function at maximum efficiency, generally, and at Virginia Tech.
Contents
Use Local Mirrors
Virginia Tech has several local mirrors of Linux and other Free and Open Source Software. Using Virginia Tech's mirrors has the main advantage of being fast.
You will need to alter your /etc/apt/sources.list file. First of all, make a backup of your original. Open a terminal emulator (Applications → Accessories → Terminal) and enter the command:
$ sudo cp /etc/apt/sources.list /etc/apt/sources.list.original
Next, copy the commands below into a shell script. You can use a
text editor like gedit; Applications → Accessories → Text Editor.
Select the mirror you wish to remove by uncommenting (removing the
beginning # character from) one of the two lines with MIRROR=. Save it in your home directory as vtmirror.sh:
#!/bin/sh
## Uncomment one of the two MIRROR lines below to choose your mirror
##
## VT Campus Computing mirror
#MIRROR="mirror.cc.vt.edu/pub/ubuntu"
## VBI Mirror (which also hosts PowerPC and SPARC repositories)
#MIRROR="mirrors.vbi.vt.edu/mirrors/linux/ubuntu"

sed "s,\(us\.\)\?archive.ubuntu.com/ubuntu,$MIRROR," /etc/apt/sources.list.original |\
sed s,security.ubuntu.com/ubuntu,$MIRROR, > \
/etc/apt/sources.list.new
mv /etc/apt/sources.list.new /etc/apt/sources.list
IMPORTANT: make sure that you have uncommented one of the MIRROR= lines.
Next, in your terminal window, change the permissions on this file to make it executable:
$ chmod u+x vtmirror.sh
Finally, run the script from the terminal with
$ sudo ./vtmirror.sh
Next, update your package information. You can do this in the terminal with
$ sudo apt-get update
You can also do this with the Update Manager in System → Administration → Update Manager. You will now be downloading all standard Ubuntu packages from your local VT mirror.
Setup VT-Wireless
Follow the instructions in the VT-Wireless article to get your wireless connection setup to automatically and securely connect to the campus wireless network. You'll either need to use OpenSSL from a terminal window to convert the certificate you obtain from CNS or switch from NetworkManager to Wicd, but the VT-Wireless article discusses the details of both options pretty thoroughly.
Setup Email
See the email article for instructions on setting up your preferred email client to download and send email (including for reliable off-campus sending), and how to add the LDAP faculty address book.
Customize Your Desktop
While not necessary, the desktop customization guide may improve your desktop experience.
Broadcom Wireless
This walks through the installation of the proprietary driver. Remove all installed Broadcom drivers (b43*, fwcutter, etc.) Reboot.
$ rm -r hybrid-portsrc*
$ sudo apt-get install build-essential
$ wget http://www.broadcom.com/docs/linux_sta/hybrid-portsrc-x86_64-v5.10.91.9.3.tar.gz
$ tar -xzvf hybrid-portsrc-x86_32-v5.10.91.9.3.tar.gz
$ make
$ sudo make install
Reboot again, should now show up under "Restricted Drivers".
Touchpad Button
This only will apply to those who have a touchpad with a button that disables the touchpad. Synaptics touchpad driver and Gnome both disable the touchpad individually. For some reason, Gnome (in particular gnome-settings-daemon) fails to re-enable it; which is why you will end up with a dead touchpad, once you disable it. If you find yourself with a dead touchpad, here is what you should do. First of all, open a terminal. Press Alt+F1 to open the applications menu and choose the Terminal application from the accessories or use an external mouse to so.
To bring your touchpad back to life, enter the following command into terminal:
gconftool --type bool --set /desktop/gnome/peripherals/touchpad/touchpad_enabled true
The key "/desktop/gnome/peripherals/touchpad/touchpad_enabled" is where gnome-settings-daemon remembers that you disabled your touchpad. This is the reason, why it is disabled even after a reboot.
The issue will re-appear, next time you disable your touchpad. You need to prevent gnome-settings-daemon from disabling your touchpad in the first place, because the Synaptics touchpad driver does this already. To do so, run the following command in a terminal:
gconftool-2 --type string --set /apps/gnome_settings_daemon/keybindings/touchpad ""
This dissociates the key to lock your touchpad from gnome-settings-daemon. If for any reason, the latter command breaks the lock touchpad support for you, than you probably have a different issue. To re-associate the key with gnome-settings-daemon, run this command:
gconftool-2 --type string --set /apps/gnome_settings_daemon/keybindings/touchpad XF86TouchpadToggle
Connect to Scholar WebDAV
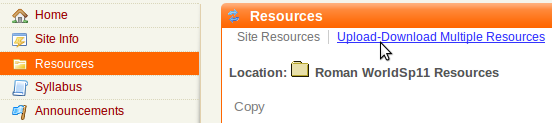
The Scholar site for students taking classes has an option for connecting to the web directory to download the resources uploaded by the teacher and site administrators. To connect, it's very simple and it makes an easy way to keep all your class resources up to date and provides an great way to copy multiple files to your computer at one time.
<img src="http://vtluug.org/w/images/4/48/VT_Resources_Scholar_Screenshot.png">
Notice the link called "Upload-Download Multiple Resources". This is the link you will click that takes you to a page with the server information you will need to connect to the remote directory. The page also includes instructions for setting the WebDAV link up on Windows and Mac computers, but not Linux, so you can ignore pretty much everything beneath the URL to the server. You will see a part that gives you a "SiteID". This "SiteID" is the unique part of the server URL that allows you to connect to it with your Virginia Tech PID.
Now, the most important part of this page is the server URL. You can find it under the part that says "To access the resources in this site through a WebDAV client, you will use the following URL:"
That URL will look like this (substitute your own SiteID for the [SiteID]):
https://scholar.vt.edu/dav/[SiteID]
- Note* We will only want the part AFTER the "https://" because otherwise, your WebDAV client may give you an error. I will be using Nautilus, the standard file manager in Ubuntu, seeing as this the Ubuntu section.
Ok, now that I have set up the information here come the steps.
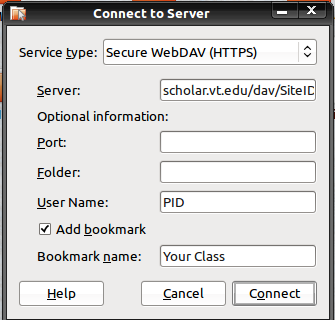
1) Open Nautilus and click File) -> Connect to Server...
2) Select "Secure WebDAV (HTTPS)" from the "service type" drop down box.
3) Put in your server info minus the "https://"
4) Put your PID in.
5) Add a bookmark if you'd like
6) Click "Connect".
7) Put in your Scholar password, and your done!
<img src="http://vtluug.org/w/images/a/a3/VT_Resources_Connect_to_Server_Screenshot.png">