Difference between revisions of "Thunderbird"
imported>Cov m (moved Thunderbird Mail to Thunderbird) |
imported>Matt (Added Thunderbird 3 setup instructions, other edits.) |
||
| Line 1: | Line 1: | ||
| − | '''Mozilla Thunderbird''' is a cross-platform e-mail, Usenet, and RSS reader from Mozilla. The following steps outline how to | + | '''[http://www.mozillamessaging.com/en-US/ Mozilla Thunderbird]''' is a cross-platform e-mail, Usenet, and RSS reader from Mozilla. It supports both POP and IMAP, and can be used with Virginia Tech's e-mail service. |
| + | |||
| + | The following steps outline how to use Thunderbird with Virginia Tech's e-mail services. Thunderbird 3 is the latest version, and is far easier to set up. However version 2 is still in wide use so Thunderbird 2 is covered as well. | ||
| + | |||
| + | ''Note that the following screenshots are from an Ubuntu machine, however they are still applicable to most other operating systems, including Windows and Mac OS X. The largest difference in the illustrations is that the Account Settings dialog box is located in the Tools menu in the Windows and Mac OS X versions rather than in the Edit menu.'' | ||
== Setting up your Virginia Tech account == | == Setting up your Virginia Tech account == | ||
| − | === Adding the account with the account wizard === | + | === Thunderbird 3 === |
| − | We will need to add the VT e-mail account using the account wizard. If you have no other accounts in Thunderbird, the account wizard should start up automatically. If not, go to the Edit menu, click on Account Settings, and click the Add account... button to make it appear | + | Version 3 attempts to set up your account automatically with as little input needed from the user as possible. Even so, the outgoing (SMTP) server will not be detected correctly due to the unconventional address CNS uses for it, so it will need to be entered in manually. Fortunately this can be done without having to go through extra steps. |
| + | |||
| + | If you have no existing accounts, Thunderbird will display the Mail Account Setup box. If not, navigate to <code>Edit/Tools > Account Settings...</code>, click <code>Account Actions</code>, and click <code>Add Mail account...</code> from the drop-down list. | ||
| + | |||
| + | [[File:Thunderbird 3 - Mail Account Setup.png]] | ||
| + | |||
| + | Enter what you want others to see in the <code>From:</code> line of messages when they receive mail from you in the <code>Your name</code> field. Your full name is recommended. Enter '''pid@vt.edu''' for the e-mail address, replacing '''pid''' with your Virginia Tech PID. Enter your password in the <code>Password</code> field. Click <code>Continue</code> to tell Thunderbird to try and find any possible mail servers on vt.edu. | ||
| + | |||
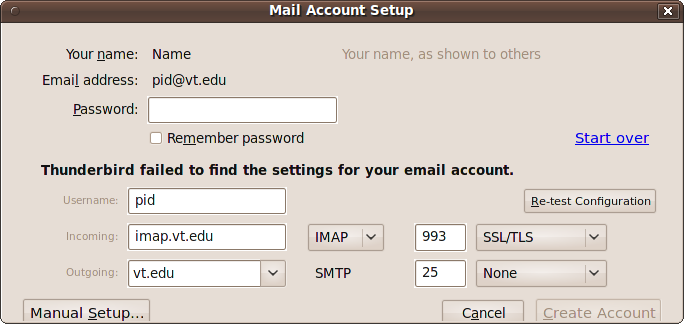
| + | [[File:Thunderbird 3 - detection fail.png]] | ||
| + | |||
| + | Thunderbird will find the IMAP server, and fail to find the outgoing SMTP server. If you want to use IMAP, you can leave this as it is. I you want the POP service instead, change '''imap.vt.edu''' to '''pop.vt.edu'''. Change the <code>Outgoing:</code> field to '''auth.smtp.vt.edu'''. The other settings will be corrected automatically, so they may be left as they are. | ||
| + | |||
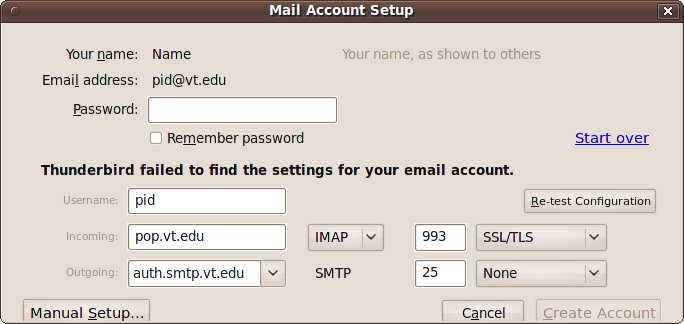
| + | [[File:Thunderbird 3 - corrections.png]] | ||
| + | |||
| + | Click <code>Re-test Configuration</code>. Thunderbird will try again with the new settings, and will correctly configure the account. | ||
| + | |||
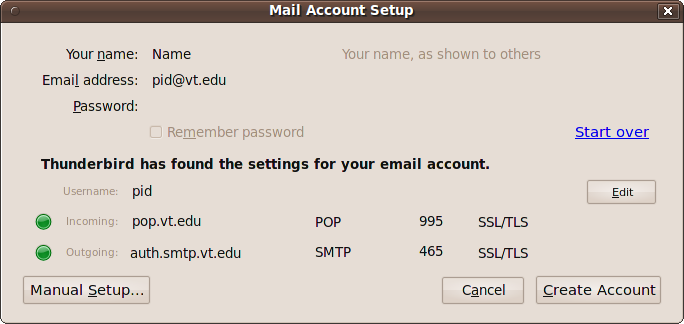
| + | [[File:Thunderbird 3 - detection success.png]] | ||
| + | |||
| + | Click <code>Create account</code> to finish. | ||
| + | |||
| + | === Thunderbird 2 === | ||
| + | ==== Adding the account with the account wizard ==== | ||
| + | We will need to add the VT e-mail account using the account wizard. If you have no other accounts in Thunderbird, the account wizard should start up automatically. If not, go to the <code>Edit</code>/<code>Tools</code> menu, click on <code>Account Settings</code>, and click the <code>Add account...</code> button to make it appear. | ||
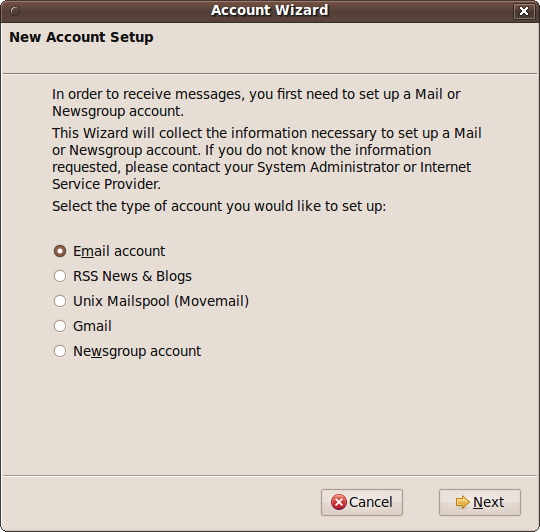
[[File:Thunderbird 2 Account Wizard - Account Type.png]] | [[File:Thunderbird 2 Account Wizard - Account Type.png]] | ||
| − | Email account should be automatically selected. If not, select it and click Next. | + | <code>Email account</code> should be automatically selected. If not, select it and click <code>Next</code>. |
[[File:Thunderbird 2 Account Wizard - Identity.png]] | [[File:Thunderbird 2 Account Wizard - Identity.png]] | ||
| − | The Name field will list whatever you put here in the From: line of those who receive e-mail from you | + | The <code>Name</code> field will list whatever you put here in the <code>From:</code> line of those who receive e-mail from you. Entering your full name is recommended. Enter '''pid@vt.edu''' for the e-mail address, replacing '''pid''' with your Virginia Tech PID. Then click <code>Next</code>. |
[[File:Thunderbird 2 Account Wizard - Server Information.png]] | [[File:Thunderbird 2 Account Wizard - Server Information.png]] | ||
| − | Be sure the POP button is selected, enter | + | Be sure the <code>POP</code> button is selected, enter '''pop.vt.edu''' for the incoming server, and then enter '''auth.smtp.vt.edu''' for the outgoing server. If you want to leave your messages on the server and use IMAP instead, click the <code>IMAP</code> button and enter '''imap.vt.edu''' for the incoming server. Note that if you have accounts in Thunderbird already, the software will default to the outgoing server of one of your previous accounts. This will need to be fixed later if that is the case. Click <code>Next</code>. |
[[File:Thunderbird 2 Account Wizard - User Names.png]] | [[File:Thunderbird 2 Account Wizard - User Names.png]] | ||
| − | Make sure your PID is entered in both fields and click Next. If there are previous accounts, only the first field will appear. | + | Make sure your PID is entered in both fields and click <code>Next</code>. If there are previous accounts, only the first field will appear. |
[[File:Thunderbird 2 Account Wizard - Account Name.png]] | [[File:Thunderbird 2 Account Wizard - Account Name.png]] | ||
| − | The Knowledge Base says to call your account VT Mail, but you can really call it anything you want. Thunderbird defaults to the e-mail address. Change it if you want and click Next. | + | The Knowledge Base says to call your account '''VT Mail''', but you can really call it anything you want. Thunderbird defaults to the e-mail address. Change it if you want and click <code>Next</code>. |
[[File:Thunderbird 2 Account Wizard - Finished.png]] | [[File:Thunderbird 2 Account Wizard - Finished.png]] | ||
| − | Make sure to uncheck the Download messages now box, since | + | Make sure to uncheck the <code>Download messages now</code> box, since some extra changes need to be made before connecting. If the IMAP option was chosen, or if an account has been set up before, the box will be absent. Click <code>Finish</code>. |
| − | === Enabling SSL === | + | ==== Enabling SSL ==== |
| − | + | Thunderbird does not ask in the wizard if the mail server uses SSL, and assumes that it does not. However, the VT mail server does use SSL, so this will need to be enabled before messages can be downloaded. While it is not absolutely necessary to set up SSL SMTP (outgoing mail) if mail is only sent from on-campus, setting it up is recommended. | |
| − | Get to the Account Settings | + | Get to the <code>Account Settings</code> box. |
[[File:Thunderbird Account Settings Menu.png]] | [[File:Thunderbird Account Settings Menu.png]] | ||
| − | Click Server Settings on the left, and click on the SSL button to the right. | + | Click <code>Server Settings</code> on the left, and click on the <code>SSL</code> button to the right. |
[[File:Thunderbird 2 POP3 SSL.png]] | [[File:Thunderbird 2 POP3 SSL.png]] | ||
| − | Now click on Outgoing Server (SMTP) on the left, find auth.smtp.vt.edu in the list, click on it and click the Edit... button. If you had to skip entering it in when you made the account, click Add... and enter it in now. In any case make sure that the SSL button is selected, Use name and password is checked, and your PID is in the User Name field. You may optionally enter in a description if you wish. Click OK when you're done. | + | Now click on <code>Outgoing Server (SMTP)</code> on the left, find '''auth.smtp.vt.edu''' in the list, click on it and click the <code>Edit...</code> button. If you had to skip entering it in when you made the account, click <code>Add...</code> and enter it in now. In any case make sure that the <code>SSL</code> button is selected, <code>Use name and password</code> is checked, and your PID is in the <code>User Name</code> field. You may optionally enter in a description if you wish. Click <code>OK</code> when you're done. |
[[File:Thunderbird 2 SMTP SSL.png]] | [[File:Thunderbird 2 SMTP SSL.png]] | ||
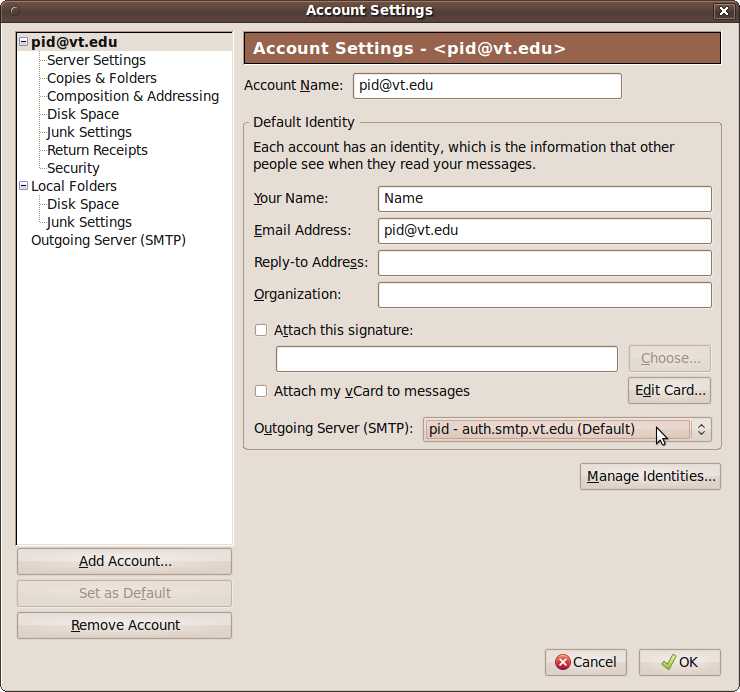
| − | If you added the outgoing server in the wizard, you can go ahead and click OK in the Account Settings | + | If you added the outgoing server in the wizard, you can go ahead and click <code>OK</code> in the Account Settings box. If you had to add the outgoing server here, go back to your account by clicking on the account name on the left and selecting the '''auth.smtp.vt.edu''' option from the drop-down list. Then click <code>OK</code>. |
[[File:Thunderbird 2 Account Settings SMTP.png]] | [[File:Thunderbird 2 Account Settings SMTP.png]] | ||
| − | Now click the Get Mail button in the toolbar, enter your PID password when asked, and | + | Now click the <code>Get Mail</code> button in the toolbar, enter your PID password when asked, and Thunderbird will download your mail.. |
[[Category:Howtos]] | [[Category:Howtos]] | ||
[[Category:Mail clients]] | [[Category:Mail clients]] | ||
Revision as of 04:59, 22 December 2009
Mozilla Thunderbird is a cross-platform e-mail, Usenet, and RSS reader from Mozilla. It supports both POP and IMAP, and can be used with Virginia Tech's e-mail service.
The following steps outline how to use Thunderbird with Virginia Tech's e-mail services. Thunderbird 3 is the latest version, and is far easier to set up. However version 2 is still in wide use so Thunderbird 2 is covered as well.
Note that the following screenshots are from an Ubuntu machine, however they are still applicable to most other operating systems, including Windows and Mac OS X. The largest difference in the illustrations is that the Account Settings dialog box is located in the Tools menu in the Windows and Mac OS X versions rather than in the Edit menu.
Contents
Setting up your Virginia Tech account
Thunderbird 3
Version 3 attempts to set up your account automatically with as little input needed from the user as possible. Even so, the outgoing (SMTP) server will not be detected correctly due to the unconventional address CNS uses for it, so it will need to be entered in manually. Fortunately this can be done without having to go through extra steps.
If you have no existing accounts, Thunderbird will display the Mail Account Setup box. If not, navigate to Edit/Tools > Account Settings..., click Account Actions, and click Add Mail account... from the drop-down list.
Enter what you want others to see in the From: line of messages when they receive mail from you in the Your name field. Your full name is recommended. Enter pid@vt.edu for the e-mail address, replacing pid with your Virginia Tech PID. Enter your password in the Password field. Click Continue to tell Thunderbird to try and find any possible mail servers on vt.edu.
Thunderbird will find the IMAP server, and fail to find the outgoing SMTP server. If you want to use IMAP, you can leave this as it is. I you want the POP service instead, change imap.vt.edu to pop.vt.edu. Change the Outgoing: field to auth.smtp.vt.edu. The other settings will be corrected automatically, so they may be left as they are.
Click Re-test Configuration. Thunderbird will try again with the new settings, and will correctly configure the account.
Click Create account to finish.
Thunderbird 2
Adding the account with the account wizard
We will need to add the VT e-mail account using the account wizard. If you have no other accounts in Thunderbird, the account wizard should start up automatically. If not, go to the Edit/Tools menu, click on Account Settings, and click the Add account... button to make it appear.
Email account should be automatically selected. If not, select it and click Next.
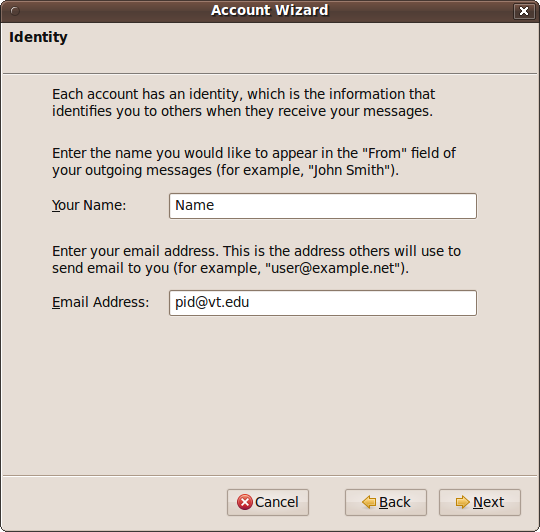
The Name field will list whatever you put here in the From: line of those who receive e-mail from you. Entering your full name is recommended. Enter pid@vt.edu for the e-mail address, replacing pid with your Virginia Tech PID. Then click Next.
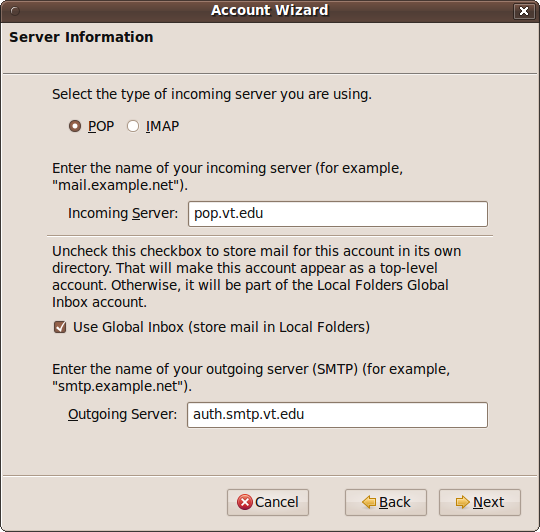
Be sure the POP button is selected, enter pop.vt.edu for the incoming server, and then enter auth.smtp.vt.edu for the outgoing server. If you want to leave your messages on the server and use IMAP instead, click the IMAP button and enter imap.vt.edu for the incoming server. Note that if you have accounts in Thunderbird already, the software will default to the outgoing server of one of your previous accounts. This will need to be fixed later if that is the case. Click Next.
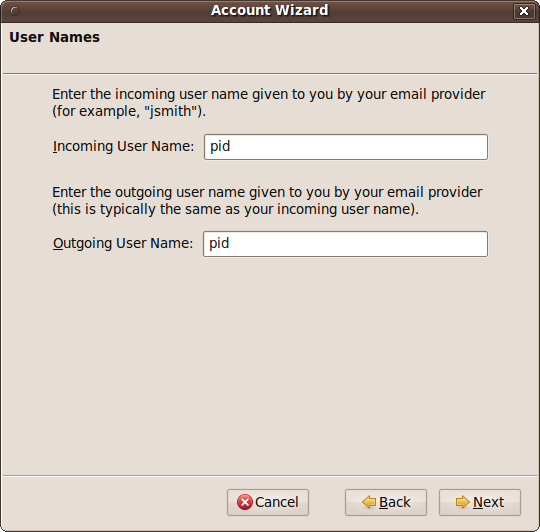
Make sure your PID is entered in both fields and click Next. If there are previous accounts, only the first field will appear.
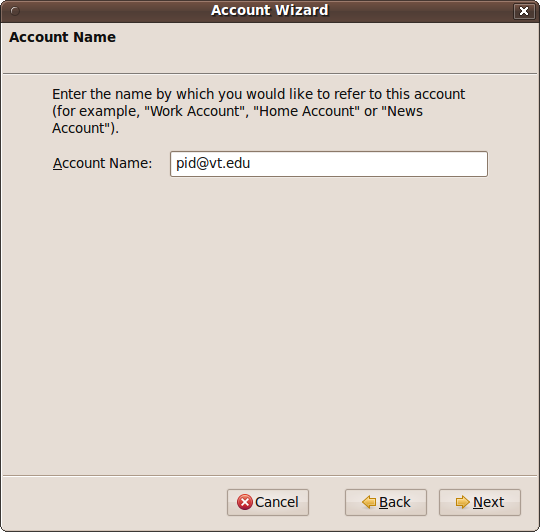
The Knowledge Base says to call your account VT Mail, but you can really call it anything you want. Thunderbird defaults to the e-mail address. Change it if you want and click Next.
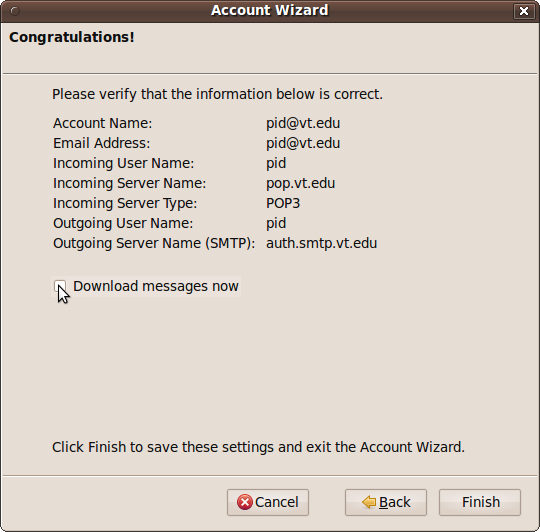
Make sure to uncheck the Download messages now box, since some extra changes need to be made before connecting. If the IMAP option was chosen, or if an account has been set up before, the box will be absent. Click Finish.
Enabling SSL
Thunderbird does not ask in the wizard if the mail server uses SSL, and assumes that it does not. However, the VT mail server does use SSL, so this will need to be enabled before messages can be downloaded. While it is not absolutely necessary to set up SSL SMTP (outgoing mail) if mail is only sent from on-campus, setting it up is recommended.
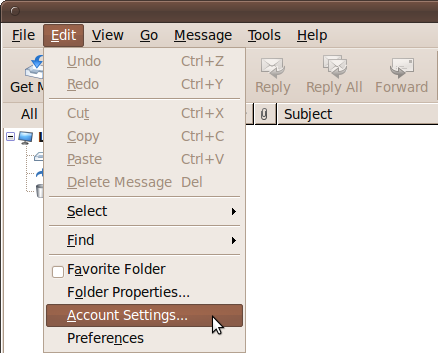
Get to the Account Settings box.
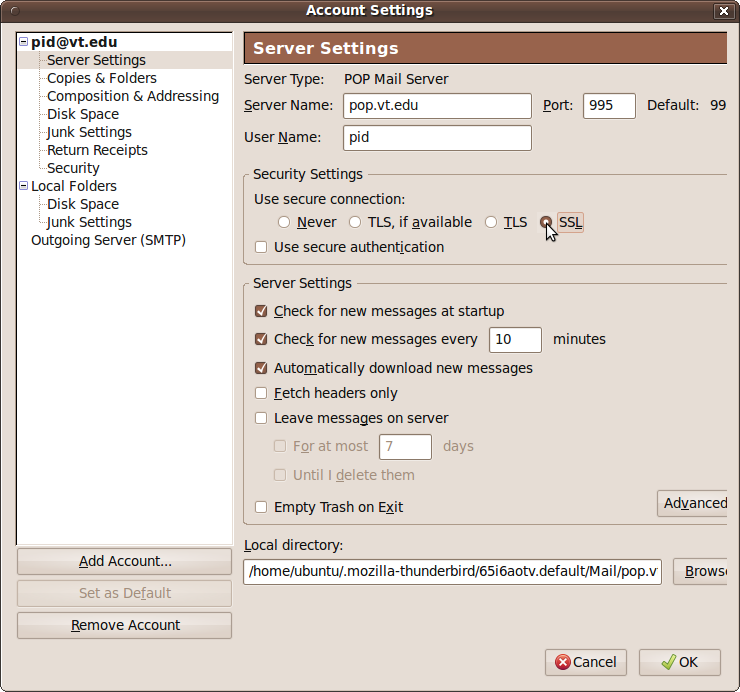
Click Server Settings on the left, and click on the SSL button to the right.
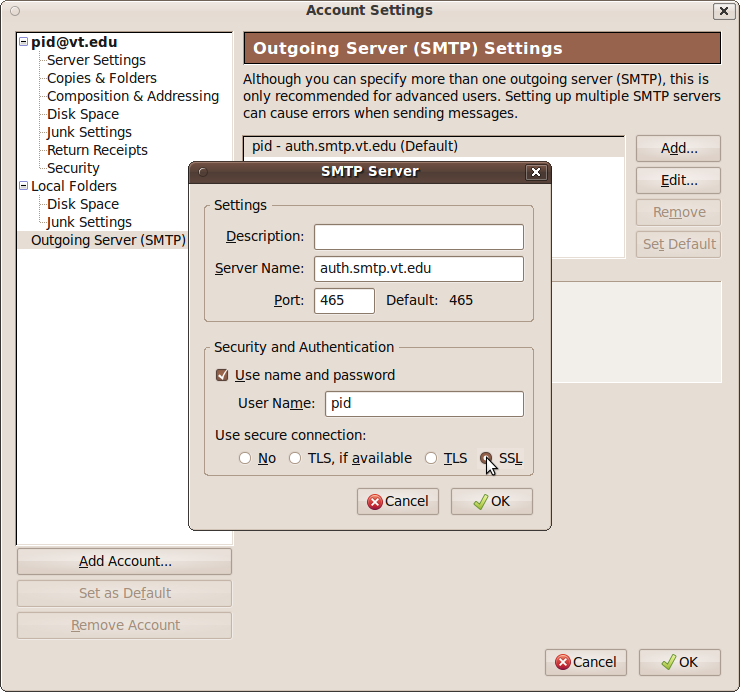
Now click on Outgoing Server (SMTP) on the left, find auth.smtp.vt.edu in the list, click on it and click the Edit... button. If you had to skip entering it in when you made the account, click Add... and enter it in now. In any case make sure that the SSL button is selected, Use name and password is checked, and your PID is in the User Name field. You may optionally enter in a description if you wish. Click OK when you're done.
If you added the outgoing server in the wizard, you can go ahead and click OK in the Account Settings box. If you had to add the outgoing server here, go back to your account by clicking on the account name on the left and selecting the auth.smtp.vt.edu option from the drop-down list. Then click OK.
Now click the Get Mail button in the toolbar, enter your PID password when asked, and Thunderbird will download your mail..

