Difference between revisions of "EAP-TLS (OLD)"
imported>Mutantmonkey (Remove netcfg instructions) |
imported>Ram (Add warning about deprecation) |
||
| Line 1: | Line 1: | ||
| + | '''Warning:''' Much of the information on this page is outdated and may no longer be a supported configuration. For more information see [[Virginia Tech Wifi]]. | ||
| + | |||
This article describes how to setup '''EAP-TLS''' on various Linux distributions. EAP-TLS is a strong wireless authentication scheme of choice for many large institutions such as universities and corporations and is used by Virginia Tech for connections to [[VT-Wireless]]. | This article describes how to setup '''EAP-TLS''' on various Linux distributions. EAP-TLS is a strong wireless authentication scheme of choice for many large institutions such as universities and corporations and is used by Virginia Tech for connections to [[VT-Wireless]]. | ||
Revision as of 21:27, 2 February 2015
Warning: Much of the information on this page is outdated and may no longer be a supported configuration. For more information see Virginia Tech Wifi.
This article describes how to setup EAP-TLS on various Linux distributions. EAP-TLS is a strong wireless authentication scheme of choice for many large institutions such as universities and corporations and is used by Virginia Tech for connections to VT-Wireless.
Contents
Obtain the VT-Wireless Certificate
Regardless of what program you use to make your connection, you will need to obtain your p12 certificate and password from CNS, which is needed to establish your connection. Note the certificate password; you can save it permanently if you'd like; but you will only need it during set up.
NetworkManager
Tested on Fedora 16 (updated on 2012-02-25), Red Hat 6.3 (updated on 2013-04-08) and Ubuntu 12.04 (updated on 2013-09-09).
- Open Network Connections
- Click the 'Wireless' tab to view Wireless Networks
- Click the 'Add' button to add a new Wireless Network
- Enter a name for the connection in the 'Connection name' text box; this can be anything you want to use
- Enter 'VT-Wireless' as the value of the SSID in the 'Wireless' tab
- Select the 'Wireless Security' tab.
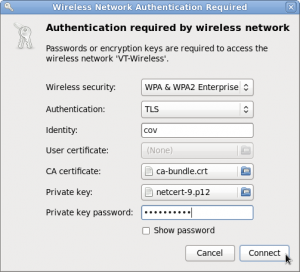
- Select WPA & WPA2 Enterprise from the 'Security' drop-down menu
- Choose TLS as the authentication type from the 'Authentication' drop-down menu
- Type in your PID in the 'Identity' text box
- To get 'User Certificate':
- obtain your p12 certificate and password from CNS. Say, the p12 certificate you obtained is: netcert-13.p12
- In terminal, cd to the directory where you downloaded your p12 file and type:
openssl pkcs12 -in netcert-13.p12 -out netcert.pem - Use the resulting netcert.pem file as the User Certificate (we will also use this as a Private Key)
- For the 'CA certificate,' click the file chooser box and navigate to the /etc/ssl/certs folder to choose the necessary certificate
- On some distributions, you may be able to press Ctrl-L and type 'ca_cert' to select the appropriate certificate. On other distributions (like Red Hat), it may be necessary to select ca-certificates.crt or ca-bundle.crt after navigating to the /etc/ssl/certs folder.
- For the 'Private key,' click the file chooser box and navigate to the netcert.pem file you created earlier that has your private key from Virginia Tech
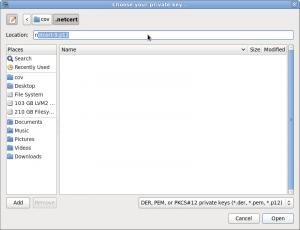
- The file selection filter for choosing the private key is currently broken (as of April 2013). The workaround is to open the file chooser in the upper-left hand corner of the window and navigate to the directory containing your .p12 file. Then, click the 'Type a file name' button (it looks like a pencil and paper), or press control+l to open the 'Location' box.
- In the location box, begin to type the name of your certificate file (the default name is 'netcert'). The field will autocomplete, at which point you can press enter or click the 'Open' button in the bottom-right hand corner of the window.
- Enter the private key password that you were given while downloading the certificate file from Virginia Tech earlier in the 'Private key password' text box
- Click the 'save' button in the bottom-right hand corner of the window
- Try to connect with VT-wireless now
- Your computer should now connect to the VT-Wireless secure network
- You may be prompted again by the Network Manager for your login credentials when it attempts to connect to the VT-Wireless network. Make sure the previously described settings (TLS, certificates, etc.) are selected again and connect to the network again.
wicd
Tested on Ubuntu 10.10 with wicd 1.7.0 (updated on 2011-04-08).
- Install wicd:
sudo apt-get install wicd - Make sure NetworkManager is completely uninstalled; run this command:
sudo apt-get remove network-manager - Find VT-Wireless in the network list and hit Connect.
- Check "Use these settings for all networks sharing this essid"
- Select EAP-TLS from the dropdown menu.
- For identity, enter your PID.
- For private key, enter the path to your downloaded p12 file.
- Enter your private key password.
- For the Path to CA Cert, enter /etc/ssl/certs/GlobalSign_Root_CA.pem
- Hit OK
- Check "Automatically connect to this network"
- Hit Connect
netctl
Tested on Arch Linux with netctl 0.8 (updated on 2013-04-12).
- Create a file, /etc/netctl/VT-Wireless and place this in it:
Description="VT-Wireless EAP-TLS"
Interface=wlan0
Connection=wireless
Security=wpa-configsection

IP=dhcp
IP6=stateless

WPAConfigSection=(
    'ssid="VT-Wireless"'
    'proto=RSN'
    'key_mgmt=WPA-EAP'
    'eap=TLS'
    'identity="YOUR IDENTITY"'
    'private_key="PATH TO YOUR PRIVATE KEY"'
    'private_key_passwd="YOUR PRIVATE KEY PASSWORD"'
    'ca_cert="/etc/ssl/certs/GlobalSign_Root_CA.pem"'
)
Make sure to change identity to your PID, private_key to the path to your downloaded p12 file, and private_key_passwd to the password for your private key.
- After creating this file, make sure to change the owner to root (
sudo chown root:root /etc/netctl/VT-Wireless) and change the permissions so that it can be read only by the owner (sudo chmod 0600 /etc/netctl/VT-Wireless). This will ensure that your private key password cannot be read by others easily.
- To connect, simply type the following in a terminal:
sudo netctl start VT-Wireless
wpa_supplicant
Tested on Arch Linux with wpa_supplicant 0.7.3 (updated on 2011-04-01).
- Place this at the bottom of your /etc/wpa_supplicant.conf:
network={
	ssid="VT-Wireless"
	proto=RSN
	key_mgmt=WPA-EAP
	eap=TLS
	identity="YOUR IDENTITY"
	private_key="PATH TO YOUR PRIVATE KEY"
	private_key_passwd="YOUR PRIVATE KEY PASSWORD"
	ca_cert="/etc/ssl/certs/GlobalSign_Root_CA.pem"
}
Make sure to change identity to your PID, private_key to the path to your downloaded p12 file, and private_key_passwd to the password for your private key.
- To connect, simply start wpa_supplicant as you would manually, for example:
sudo ifconfig wlan0 up
sudo wpa_supplicant -B -Dwext -i wlan0 -c /etc/wpa_supplicant.conf
sleep 10 && sudo dhcpcd wlan0
Android
These instructions are for Android 2.3 (Gingerbread) but may work on older versions. Getting the certificate file on your Android device can be involved. Do any of these three things or otherwise find a way to put the certificate file at the root of your USB storage (SD card):
- Email the certificate to yourself, then use your browser to access your email and download it to the SD card. Using the native Gmail client will not work.
- Use Dropbox or another such service and put the certificate file there. Then, use an Android client to access and download it. Note that you will need to likely use a file browser (such as ASTRO) to move the certificate file to the root of your SD card (typically /mnt/sdcard).
- Connect your Android to a PC via USB and enable USB mass storage. Drop the certificate file right at the root.
Next, access Android settings and choose Location & Security. Scroll down and tap Install from USB storage. You will be prompted to create a keystore password (if you haven't done so already) and to enter the password provided by NetCert for the key. Once done, make sure the Use secure credentials checkbox is checked.
Access Android settings and select Wireless & networks. Tap Wi-Fi settings and tap your wireless network.
On the setup screen:
- Change EAP method to TLS.
- Leave Phase 2 authentication at None.
- Leave CA certificate at (unspecified).
- Change User certificate to the name of the certificate you installed for this network.
- For Identity, you may leave it blank or enter your PID, depending on network.
- Leave all other fields blank.
Tap Connect.

