Difference between revisions of "Evolution"
imported>Cov |
imported>Echarlie |
||
| Line 65: | Line 65: | ||
POP setup will follow soon. | POP setup will follow soon. | ||
| − | [[Category: | + | [[Category:Mail Clients]] |
Revision as of 04:37, 14 July 2016
Evolution Mail Setup
This section will go over the setup of Evolution Mail, a great email management application. "Evolution provides integrated mail, address book and calendaring functionality to users of the GNOME desktop." Evolution
1) Open Evolution.
2) Click Edit) -> Preferences).
3) You will see a screen like the following. You will need to click "Add".
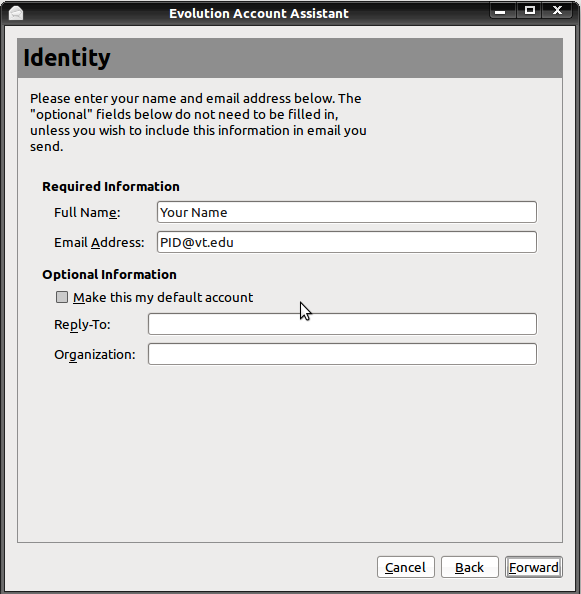
4) You will need to put in the following wizard your Name and your email address (something like [Pid]@vt.edu).
5) Click "Forward".
IMAP Setup
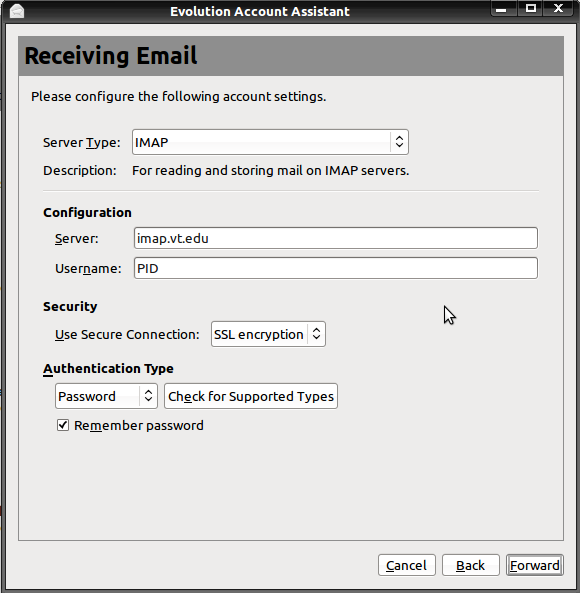
6) If not already selected, pick "IMAP" from the "Server Type" drop-down list.
7) Put "imap.vt.edu" for the "Server".
8) Put your PID for the "Username".
9) For the "Security" drop-down list, pick "SSL encryption".
10) If not already selected, pick "Password" from the "Authentication Type".
11) Place a check in the "Remember Password" box, or don't. It's up to you.
12) press "Forward".
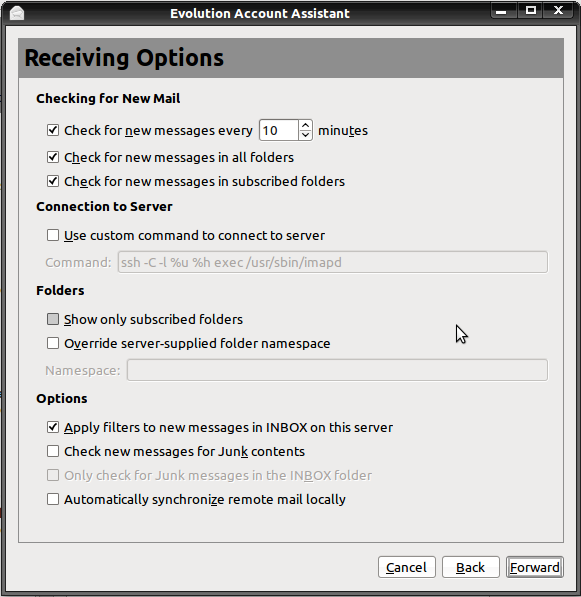
13) Place a check mark in: "Check for new messages ever [time] minutes", "Check for new messages in all folders", "Check for new messages in subscribed folders". You don't HAVE to do these, it is a personal preference. You can really change any of the values to what you want.
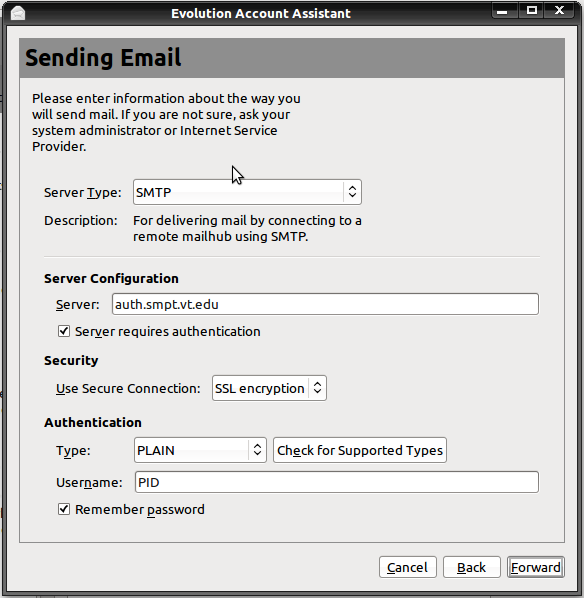
14) If not already selected, pick "SMTP" from the "Server Type" drop-down list.
15) Put "auth.smtp.vt.edu" for the "Server".
16) Place a check in "Server requires authentication" check box.
17) For the "Use Secure Connection" drop-down list, pick "SSL encryption".
18) If not already selected, pick "Plain" from the "Type" Under "Authentication" section.
19) Put your PID for the "Username".
20) Place a check in the "Remember Password" box, or don't. It's up to you.
21) Click "Forward".
22) Put whatever name you want for your email account to show up as in Evolution. Like "VT Mail", etc.
23) There should be a "Finish" (or something) button in the last screen. Click it and your done!
POP Setup
POP setup will follow soon.


